What is Git? Learn Github, Gitlab Commands for Beginners
What is Git?
Github is a piece of software or system that allows you to perform version control of your code.Large software projects require some piece of software to keep track of all the different changes made to a codebase in order to track things like: Who edited a certain file; what they changed; and how to get back to the original code if necessary. Git does all of these things and more.
There are 2 types of Version Control System (VCS)
1. Centralized Version Control System (CVCS)
2. Distributed Version Control System (DVCS)
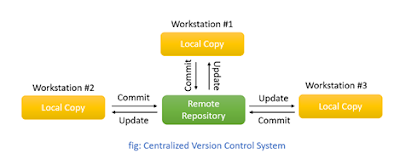
Centralized Version Control System [CVCS] provides a single repository to which multiple users can directly access, A central server to store all files. Every operation is done by the user directly performed on the main repository.

· Your system i.e. workstation needs to be connected to the network to perform any action.
· As central server stores all data, if that server got crashed or corrupted, that will surely result in loss of project data.
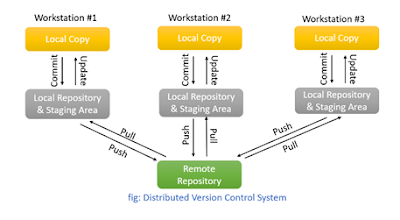
Here comes the Distributed Version Control System (DVCS) to rescue.

If a user wants to update the remote repository or wants to get an update from a remote repository, he needs to perform Git’s pull-push operations.
Features Of Git:
1. Free & Open Source:Git is free and open-source software distributed under General Public License Version 2. No need to purchase and we can modify the source code as a requirement and use it as it is open source.
2. Fast:
When you perform operations on git, you will realize how fast it is. Not all operation user performs the required network. Plus, git is faster than other version control systems. The Git’s core written in C, which helps to avoid runtime overheads associated with other high-level languages.
3. Security
Cryptographic method SHA-1 use by git to name and identify objects within its repository. Once you commit data to a remote repository you cannot change it without being noticed. The repository’s commit history shows all kinds of activities like file name lists which are added, removed, modified as well as what that file contains. All this helps to keep the track of tasks with precision.
4. Distributed
As the user has a clone of a remote repository on their system, even if server data got corrupted you will still have your data.
5. Local repository
The local repository and Staging Area are the intermediate stages where commits can be formatted and modified as users required before doing the final commit on the remote repository.
6. Branching is Easy:
Git made branch management very easy. User can create multiple local branches which are independent of each other. Users can do their tasks in these isolated environments. As users have the facility to do creating and deleting operation on a branch, merging two branches is also possible.
There are multiple code hosting platforms that use git for version control and most of the commands used are similar.
Some popular platforms/examples are:
· GitHub
· GitLab
· Bitbucket
· SourceForge
· Assembla
· Phabricator
· RhodeCode
You must have heard about Git Bash & Git Shell.
Both allow the user to interact with the underlying git program. But Bash is a Linux-based command line while Shell is a native Windows command line.
How to use Git?
1. Setting your system:
As a professional, you need to set your name and email which will be updated in the remote repository every time you push your code.
Use Git Config commands for that:
- git config --global user.name “<Your Name>”
- git config --global user.email “<Your Email>”
To set comment editor use following commands:
- git config --global core.editor "notepad" [for windows]
- git config --global core.editor "gedit" [for Linux]
Once you set your editor. It will pop every time you enter Git Commit. Just fill the text. Save the editor window and close it.
You can set you name, email, or editor on Local level, Global Level, or System Level using - - local, - - global, or - - system alias respectively
2. Working alone on Project:
When you are the only person working on a remote repository, which might happen in smaller projects or if you are a freelancer. Other than you no one will be push changes in the remote repository.
Even though you are working alone avoid working on the master branch. Every time you start working on any task or feature create a new branch. Push that branch to the remote repository. Merge your branch with the master branch in the end. Then for the next task repeat the process. Here is a complete process of how you can do that.
Step 1: Copy remote repository into your system.
- git clone <Repository URL>
Step 2: You will be on the master branch first time so create a new branch with the appropriate name before you make any change in this cloned repository.
- git branch <Branch Name>
- git branch
Step 3: You will now see a list of branches present in your project. Till now you are on the master branch. Use the below commands to switch branches.
- git checkout <Branch Name> / git switch <Branch Name>
Step 4: Perform changes in Local cloned code. If want to update you newly done task in the remote directory use the below commands
- git status
All your newly created or edited file names will be in red color indicating that these changes are not yet staged.
The below command will add all your new and updated files to the staging area.
- git add -A / git add.
To check file status run the status command once more.
- git status
Now all new and updated files will be added in the staging area so these file names will be in green color
Step 5: If you set your default editor as mentioned in the first section you can use the commit command otherwise you can add the alias -m and write the comment in double-quotes.
- git commit / git commit -m “<Comment>”
Step 6: Once commit is successful you need to push your new changes in the remote repository using the below command.
- git push
Step 7: Time to merge the new branch with the master branch, so first switch to master branch then use the merge command as shown below:
- git checkout master/git switch master
- git merge <Branch Name>
Step 8: Now your master branch has all the code. You can keep the second branch as it is for future use, but if you want to remove the second branch use the below command.
- git branch -d <Branch Name>
Step 9: Once merging done make sure to create a new branch for the next task as shown in Step 2 and repeat the cycle till project completion.
3. Working with the team on Git Project:
If a team is working on a single remote repository that will increase the chances of conflicts. Extra precautions need to take while pushing your changes on the remote repository.
As long as a different team member is working on different files there will not be an issue but when the same file is edited by multiple induvial conflicts will arrive. If this scenario is handled carelessly we can lose important data which can have a catastrophic effect, resulting in data loss. Here are some ways you can avoid conflicts.
Step 1: Copy remote repository into your system.
- git clone <Repository URL>
Step 2: As you are now working in a team, make sure to get the latest changes made in the remote repository every day when you will resume your work using the pull command.
- git pull
Use the pull command every time you switch branch.
Step 3: If you have some uncommitted changes locally, and you want to switch branch git will not allow you to that. You have to discard or stash or commit those changes. Use the switch or checkout command as below to discard changes.
- git switch -f <Branch Name>
- git checkout -f <Branch Name>
Here -f is short for --force, which is an alias for --discard-changes
If you are planning to stash changes use stash command. If you stash your changes then you can apply these changes again to the same branch or different branch.
- git stash
To apply the last stashed change use the next command.
- git stash apply
If you want to commit changes you made then checkout Step 4 & Step 5 of the last section.
Step 4: Once you complete your task and done committing code, time to push your code on a remote repository.
When more than 1 person is working on the same branch there might be a possibility that after you get the latest changes using git pull, someone may push new changes in the remote repository.
In this case, if you try to push your changes. you will get an error saying that your repository does not have the latest changes so you cannot update. Even after that if you try to do force push that might result in important data loss.
So always try following commands before pushing your changes in the remote repository.
- git fetch
- git log
After fetching you will get all commit details-pushed in the remote repository plus commit present in the local repository. Log command will show all those commit lists. In this list, if your commit is in the top then you can push your commit in the remote repository otherwise follow the next step.
Step 5: If your commit is not in top means git fetch command has downloaded some commits which you don’t have in your local repository. Time to apply those fetched changes locally and add your current change after that. So, use the following command
- git rebase
- git log
Step 6: You will see rebase command will apply your commit after the fetched changes. So, you can update your commit to the remote repository without any issue.
- git push
Git has become a must-have skill for developers all around the world.
Check out the official documentation of Git 👈
The git download link is here.
Tell us in the comments section if you would like to have a GitHub tutorial to create Github projects.
Er. Hemant Mochemadkar
(Sr. Android & Flutter Developer)


Comments
Post a Comment